Workflow for building a drum track from scratch
Start with Tap2Find. Tap a rough rhythm on your keyboard or pad — even a simple kick-snare pattern works. The search returns matching MIDI grooves from the library. Preview a few by clicking them, then drag one to the song track.
Open the Grid Editor next. The groove you dragged is now visible as MIDI notes. Adjust the kick placement, add a crash on the chorus downbeat, or delete the fill at bar 8. The editor works like a standard piano roll, so anyone familiar with DAW editing can move fast.
Use Edit Play Style on the groove. Select the section on the song track, open the Play Style panel, and nudge the velocity or timing. A straight rock beat becomes looser or tighter without redrawing MIDI notes. You can also switch the groove to a simpler or busher variant from the same library.
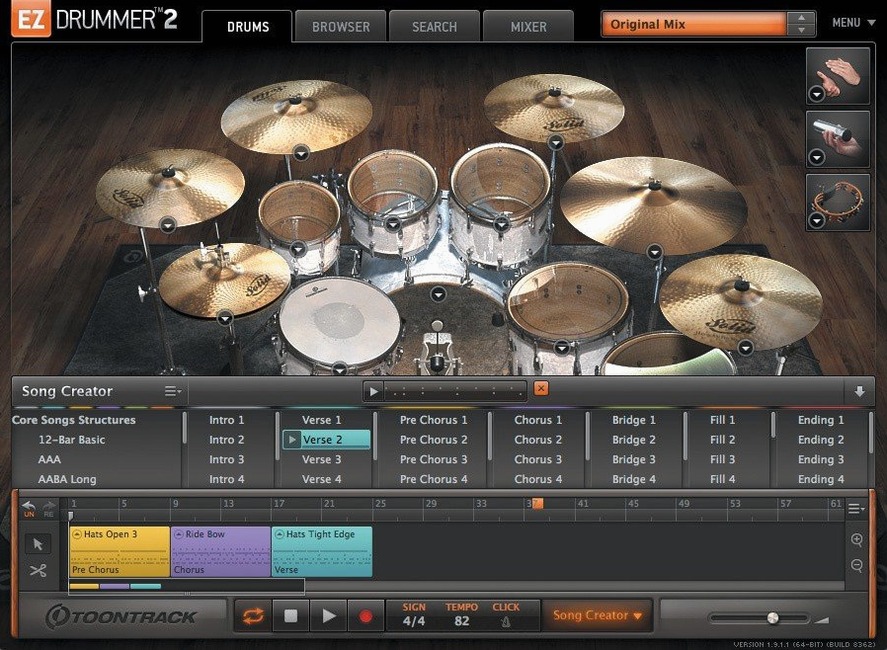
Build the song structure with the Song Creator. Mark verse, chorus, bridge sections on the timeline. The Song Creator fills each section with matching grooves from your library. You can replace any section later — just drag a new groove over it. Cut, copy, and paste parts on the song track to rearrange sections without re-recording anything.
Finish by picking a kit and a preset. Scroll through the seven kits and three rooms, then audition the mix-ready presets. Each preset changes the overhead level, room mic blend, and compression. Choose one that fits the song’s genre. No EQ or reverb needed at this stage — the preset handles the rough mix.
Ignoring Tap2Find slows down groove selection
The most common mistake is ignoring the Tap2Find feature. New users scroll through groove folders manually, which takes longer and often misses patterns that would fit better. A few taps on the keyboard returns a focused list. It is worth making Tap2Find the first stop when starting a session.
Another mistake is editing MIDI notes in the DAW instead of the Grid Editor. Dragging a groove to the DAW track, then opening the DAW’s piano roll and moving notes manually works, but you lose the ability to use Edit Play Style on the modified part. If you edit inside EZdrummer’s Grid Editor, the Play Style engine still sees the groove structure and can apply changes to it.
Some beginners skip the mix-ready presets entirely. They load a kit, hear the raw close-mic sound, and start adding compressors and EQ inside the DAW. The presets were tuned by the same engineers who recorded the kits. Auditioning five presets takes less time than building a drum mix from scratch. Start with a preset, then adjust from there.
Overwriting the song track structure too early is another issue. The Song Creator is good for a first draft, but once you manually replace sections or edit individual bars, the original arrangement is gone. Duplicate the song track before making big changes, or export the arrangement as MIDI first so you can rebuild it if needed.
Same workflow as Superior Drummer 3 but with smaller sample library
Superior Drummer 3 (also from Toontrack) uses the same workflow — same library browser, same Grid Editor, same Song Creator. The main difference is the sample library size. Superior Drummer 3 ships with a larger kit count, more room options, and deeper velocity layers. It also costs more storage space and CPU. If you already own EZdrummer 3 and want a bigger sound palette, Superior Drummer 3 is the natural upgrade. The EZX expansion packs work with both products.
Addictive Drums 2 (XLN Audio) has a similar approach: kits, presets, and a built-in groove library. Its workflow is more focused on the mixer stage — each kit includes individual channel strips with modeled console saturation. Addictive Drums 2 does not have a Song Creator or Tap2Find. You build arrangements by dragging grooves to the DAW timeline. For songwriters who want one-click arrangement tools, EZdrummer 3 moves faster. For engineers who want to sculpt the drum sound inside the plugin, Addictive Drums 2 offers more control per channel.
BFD3 (inMusic) is a sample-based drum instrument with deep editing options and a large MIDI library. Its workflow is closer to a sampler than a songwriting tool. BFD3 does not include a Song Creator or Tap2Find, and its groove browser is less visual than Toontrack’s. It is better for users who want to mic each drum individually inside the plugin. For quick songwriting, EZdrummer 3 is faster to learn and faster to get a finished arrangement.
Check Solo and Mute recall state before starting a session
Open the mixer and check the Solo and Mute recall state. The current version fixed a bug where toggling one could clear the other. Make sure both buttons respond independently before starting a session — if they do not, you are not on version 3.1.2.
Set the output routing. By default, EZdrummer 3 sends all drums on a single stereo output. If your DAW supports multi-output plugins, assign kick, snare, and overheads to separate tracks. This lets you apply individual effects inside the DAW while keeping the mix-ready preset as a starting point.
Adjust the Grid Editor snap setting. The default grid snaps to sixteenth notes. For faster editing of straight rock or pop, change it to eighth notes. For complex grooves with ghost notes, set it to 32nd notes. The snap setting is inside the Grid Editor toolbar.
Set the Edit Play Style behavior. The default Play Style is usually “Original.” From the menu, switch to “Humanize” or “Push” to hear how a groove changes with the same MIDI notes. You can toggle back to “Original” at any time. This is a quick way to audition feel without editing anything.
Works standalone or as a plugin in Logic Pro, Ableton Live, Cubase, and Reaper
EZdrummer 3 works as a standalone app or as a VST3 / AU plugin inside any DAW that supports those formats. On macOS, Logic Pro, Ableton Live, Cubase, and Reaper all load it without extra configuration. The plugin appears in the instrument list after the standard installation.
You can drag MIDI from the EZdrummer 3 library directly to a DAW track. On macOS, this uses standard drag-and-drop. The MIDI file is saved to a temporary location, then placed where you drop it. This works across Apple Silicon and Intel Macs identically.
The Bandmate feature accepts dragged audio or MIDI from any source. Drag a guitar riff from the Finder or from another DAW track onto the Bandmate area. EZdrummer 3 analyzes the rhythm and suggests grooves that match. The audio does not need to be a drum track — a bassline or vocal phrase works too.
EZdrummer 3 respects macOS audio routing. In standalone mode, select your audio interface from the settings menu. The app uses Core Audio, so any interface that macOS recognizes will show up. For headphone monitoring, set the output to your interface’s headphone channel and keep the mixer faders at unity.
The EZX expansion packs install side-by-side with the core library. After downloading an EZX pack, mount the disk image and run the installer. EZdrummer 3 scans for new content on launch. If an EZX pack does not appear, restart the app. Version 3.1.2 added internal improvements specifically for Infinity Grid EZX, so keep up to date if you use that pack.
macOS Tahoe style icons in version 3.1.2 make the standalone and project icons look consistent with other macOS 10.15 and later apps. The icons do not affect performance, but they make EZdrummer 3 easier to identify in the dock and in Finder.
- macOS 10.15 or later
- Intel or Apple Silicon processor
Questions from the notes
Does EZdrummer 3 work on Apple Silicon Macs?
Yes, EZdrummer 3 runs natively on both Intel and Apple Silicon Macs.
What is the minimum macOS version required?
macOS 10.15 (Catalina) or later is required.
Do I need version 3.1.2 for all EZX packs?
Version 3.1.2 is required for EZX expansion packs released from Q4 2025 onward.
Install procedure
Reports from players
Sign in or create a tester account to file a report.
No reports filed yet.